Tuesday, August 31, 2021

Back to School! Pencil Case Tutorial

School has started! Hallelujah! All 3 of my boys went back to school yesterday, and today is the first full day. Happy dance for Momma!

 So of course, last week we did the official school supply shopping trip. So.many.pencils! Which reminded me of this fun tutorial I put together a couple years ago for PBS Fabrics using the Ring Ring collection. The fabric may be hard to be find by now, but the tute still works! My kids still have (and use, although not for school) these pencil cases. 


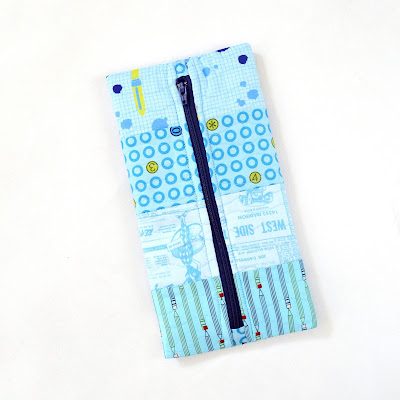
This pencil case measures 5-1/2" x 9"--perfect for holding newly sharpened #2s!


Ring Ring Pencil Case

You'll Need:
1 fat quarter each of (4) pencil prints and (1) blue dot print
(1) 12" zipper in a coordinating color
(1) 10-1/2" square of fusible batting


Cutting:
From each pencil print:
(1) 3-1/2" x 10-1/2" piece

From the blue dot:
(1) 10-1/2" square
(2) 1-1/2" x 3" pieces

Make the Pencil Case:
Step 1 Sew the (4) 3" x 10-1/2" pencil pieces together lengthwise.


Step 2 Fuse the 10-1/2" batting square to the back and quilt as desired. I stitched 1/4" on each side of the seams.


Step 3 Press in 1/4" on both short ends of the 1-1/2" x 3" blue dot pieces as shown. Fold and press the piece in half. 


Step 4 Tuck the zipper pull end of the zipper into the center fold of a blue dot piece. Stitch across the zipper to secure both sides of the blue dot piece to the zipper as shown. Align the zipper with the pieced bag square and trim the opposite zipper end 1/8" in from the end. Be careful not to pull the zipper apart! 


Step 5 Tuck the raw end of the zipper into the second folded blue dot piece and stitch to secure. Your zipper with tabs should be the same length as the pieced bag square.


Step 6 Trim the blue dot tabs even with the zipper width. 


Step 7 Lay the zipper right side down on the pieced bag square as shown and pin into place.


Step 8 Layer the 10-1/2" blue dot square right sides together on the zipper. Pin into place and stitch, using a zipper foot. 
Step 9 Press the pieced bag square and blue dot square away from the zipper. Topstitch 1/4" from the edge of the zipper. 


Step 10 Align the opposite end of the pieced square with the other side of the zipper, right sides together, and pin. 


Step 11 Fold the blue dot lining square back onto itself and align with the zipper. Pin in place and stitch using a zipper foot. 


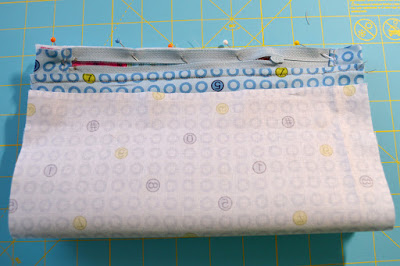
Step 12 Turn the case right side out. Topstitch along the second zipper edge is a little trickier. You'll need to manipulate the case so the zipper edge where you're stitching is in the zipper opening, and ensure that the rest of the case doesn't get in the way. 


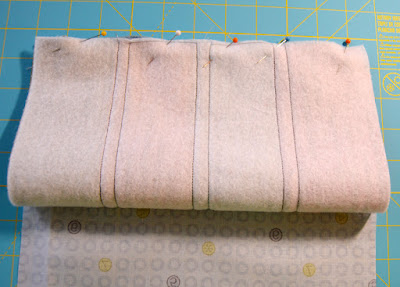
Step 13 At this point, your case should look like this. Press it flat so the zipper is centered.


Step 14 Turn the case wrong side out. Make sure the zipper is open! Stitch along each end using a 1/4" seam allowance. Use a zig zag stitch to finish off the raw edges. 


Step 15 Turn the case right side out and fill with pencils. 


The pencil print is an obvious choice for this case, but I love this monochromatic version as well. 


Each of my boys ended up making their own cases (with a little help) after I made these first two. This is from 3 years ago--I can't believe how much they've grown since this picture!


If you're new here, welcome! I hope you'll stay and look around a bit. 
If you like what you've seen here, you can also find me:
To find all of my quilt patterns, visit my Etsy shop
Find me on IG here.
Find me on Facebook here.
Sign up for my newsletter in the right-hand sidebar or here
(You'll receive a free pattern for my Diamond Drama quilt (below) as a thank you!)

Friday, August 20, 2021

Introducing Star Bows!

Today I'm excited to share my new Star Bows pattern with you. I love these oversized star blocks! They remind me of bows on gifts - do you see it too? I'd love to make this quilt in Christmas fabric next! Or maybe just a table runner? That seems more do-able before the holidays this year! 
Purchase the Star Bows pattern here.

I used the Dewdrop collection from Windham Fabrics for my quilt. I love the bright range of colors, plus the subtle stripes in the print. The icing on the cake? metallic dots! Aren't they gorgeous?! And did I mention that this pattern is fat quarter friendly?


The secret to this block is the direction the stripes run - they create movement in the star points. I think the alternating white and gray background colors add an extra pop to this quilt as well. 


The pattern includes directions to make this two-color version as well.
It gives the stars a completely different look!

Since it's August, my brain is in picnic mode. Wouldn't this make a fantastic picnic quilt? I took the quilt out to Paw Paw Lake for a little photoshoot - so summery looking!

Ready to make your own Star Bows quilt? You can purchase the pattern in my Etsy shop


If you're new here, welcome! I hope you'll stay and look around a bit. 
If you like what you've seen here, you can also find me:
To find all of my quilt patterns, visit my Etsy shop
Find me on IG here.
Find me on Facebook here.
Sign up for my newsletter in the right-hand sidebar or here
(You'll receive a free pattern for my Diamond Drama quilt (below) as a thank you!)